Game AI - Obstacle Avoidance + Flocking (In 3D!)
Obstacle Avoidance!
(again)
but now in 3D with flocking behaviors
"They say everything in life comes full circle eventually" -they
I didn't intend to revisit obstacle avoidance again so soon, but this time, it's different. The primary focus of my latest assignment was to implement flocking and obstacle avoidance (a completely different beast). Luckily for me, I had done flocking before (in 2D), and I have also done obstacle avoidance before (also in 2D, check out my blog post on it 😉). I thought the primary problem I was going to have was combining both of these into one behavior. After some thinking however, The solution I went with was pretty simple (I'll talk about that later). In order to spice things up some more, I decided to use this project as an opportunity to implement both of these behaviors in 3D and sink my toes into some of the nifty tools that Unity had to offer (there are so many tools out there that I still don't even know about).
Since I talked about obstacle avoidance in my last post my main focus will be on the flocking behavior that was implemented. I'll still talk about obstacle avoidance but my focus here will be primarily on what I did differently after moving it to 3D and not on obstacle avoidance itself. I'm going to try breaking my process into steps/parts so it's easier to follow along.
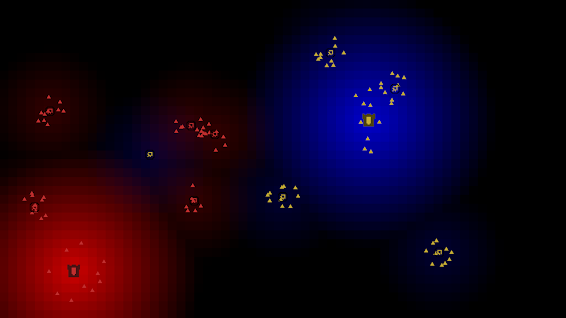
Video example (proof) of what I implemented so you can see what's going on
Step 0 - The Prep
Since things were going to be in 3D this time I didn't want to/couldn't use a dinky little triangle to show off my work anymore, I instead decided to flex my programmer art skills and create a dinky little spaceship. It has some directional features to it as well as rotational ones so it's easier to know where they are going. I quickly modeled it in Blender (a cool + Free modeling software) and slapped it into a 3D scene with physics that I completed with wireframed walls and blue obstacles to avoid. With all of these in place, I was ready to start working on the behaviors. I started with obstacle avoidance but for the sake of this post, I'm going to start by talking about Flocking.
but not before I show off the spaceships

 |
| Lil Spaceship (in black) |
Step 1 - Flocking!
The principles of the flocking behavior that I am going to use come straight from the pages of Craig Reynolds's paper on "Steering Behaviors For Autonomous Characters" (a good read if you're into that sort of stuff) He also talks about obstacle avoidance but I only cared about his flocking behaviors. In his paper, Reynolds talks about the three separate steering behaviors that when combined look similar to a flock of birds or a school of fish. These three behaviors are Cohesion, Separation, and Alignment. I'm going to further break down this step into parts to further explain them then bring it all back and talk about how you can combine them to get different results.
Part 1: Cohesion
Cohesion is the force that brings flocks together. This is normally done by getting all of the neighbors around one of the boids (the things flocking) and taking their average position to find the "center" of the flock. After that, you can apply a force in the direction of the center. This is what allows the flocks to form into distinct groups. However, without the other forces/behaviors this would just result in the boids swarming around a shifting point (sort of like a swarm of flies) this could be a desired effect but not when we are looking for a behavior that mimics a flock of birds.
 |
| A flock of boids with only Cohesion |
Part 2: Separation
Separation is what keeps individual boids apart. As you can see in the image above the boids are packed in pretty darn tight, they all want to get to the center of the flock and they have no concern for the boids around them. We can fix this by using a separation behavior to drive them apart, this is usually done by once again taking into account the neighbors around a boid, and then combining a repelling force from each neighbor (a force in the opposite direction of each neighbor). once this is done you should have a force that pushes your boid away from the neighbors in their range. You could have a set amount of force that is applied when a neighbor comes into range, but one thing that Reynolds recommends doing is tweaking some of the values so closer boids provide a stronger repelling force (Reynolds uses 1/R to scale a normalized force vector, where R is the radius of a circle he was looking for neighbors in).
 |
| A flock of boids with Cohesion and Separation (just separation would split the flock apart) (Notice how they are still in a group but they don't touch anymore) |
Part 3: Alignment
This is the final element of flocking that really ties the behavior together. While cohesion and separation alone can create a flock, without alignment they look more like a flock of bats in a cave than a flock of birds. What alignment does is point each boid in the direction of the flock as a whole. this can be done by taking the average direction of each neighbor in a radius around the boid and either turning that into a turning force that points the boid in the right direction or just applying it as a force that pushes it in the right direction (if you have boids that point in the direction of their velocities). With alignment in place, the flock will now have a flow to it that mimics the flowing movement of a flock of birds (hence flocking) or a school of fish (nobody calls it schooling).
 |
| A flock of boids with all three behaviors |
Part 4: Combining! + some other notes?
All of these behaviors apart do some nifty stuff but they only really shine when you mold them into one. There are many ways to do this, but a method that I learned (that allows you to fine-tune your flocking behavior) is by using a method of weighted blending. This allows me to create a series of artificial weights that I can scale the forces of each behavior by.
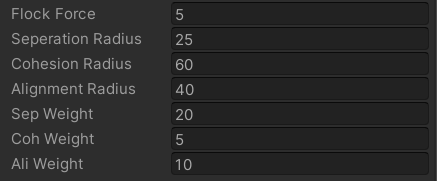 |
| The variables I used to tweak my flocking behaviors |
Notice the fact that I use an artificial bonus weight (flock force) to modify the end result. I also use variables for the Separation, Cohesion, and Alignment neighbor checking radii (Please ignore the misspelling of Separation my coding environment doesn't have a spell checker). This allows me to tweak my flocking behavior even further. The high cohesion radius allows flocks to form while the medium distanced alignment radius allows the boid to start flowing with the flock. The separation radius is the smallest since its primary goal is to keep the boids from colliding. This worked for me but you can easily find yourself with different values depending on how you implement each sub-behavior, the weights you use, and even the final behavior you are looking for (I went a little extreme in a few ways).
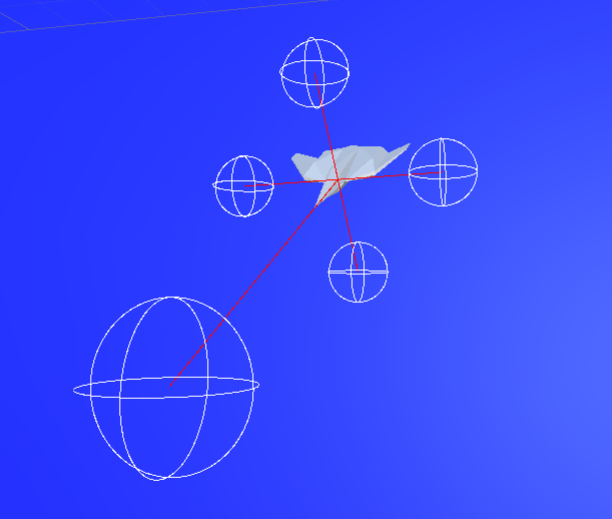
 |
| A visual representation of the three different behavior radii (sort of cluttered with the wireframe walls) |
Step 2 - Obstacle Avoidance (back again)
If you are really interested in the principles behind my implementation of obstacle avoidance then I would recommend checking out my previous blog post HERE. There I give an in-depth explanation of my approach to obstacle avoidance. What I will talk about here however is how I tweaked my approach to both adapt to 3D and get the results I wanted, and why not, while I'm at it I will also break this into parts!
Part 1: Detection
This part of the obstacle avoidance process was different for two reasons (secretly 3 but I will mention the third reason later)
- I was now in the 3rd dimension
- I took advantage of different unity tools
The first reason sort of directly leads to the second. As I mentioned in my previous blog post on obstacle avoidance a raycast (the method I used to detect obstacles previously) is infinitely thin, this meant that obstacles could barely miss your raycast but still hit your NPC. One method I mentioned for getting around this was to use a wide array of rays to fill in the blank spots in the avoider's vision. This was okay for 2D but when moving to 3D I needed to take into account the extra dimension of difficulty this brings when it comes to setting up these raycasts. Luckily for me, Unity has tools for both circlecasts (2D) and spherecasts (3D). This is similar to raycasts but they cast out a sphere instead of a beam, anything that comes into contact with this sphere will set it off and allow me to detect both where it hit and the normal of the surface that I hit. Since a sphere is thicker than an infinitely thin line I was able to detect more with less (nice!). However, this wasn't enough to get me through my 3D environment unscathed. I decided to add an extra four spherecasts to cover both the vertical and horizontal axis of my ships, I did this because one large sphere cast wasn't enough to avoid walls in the way I wanted.
 |
| A visual of the spherecasts I used (the red lines are the paths the spheres were cast along) |
Part 2: Interpreting
This is another area where I decided to tweak my obstacle avoidance to change the behavior of the spaceships. In my previous blog post, I mentioned using this step to perform some Unity trickery and instead of using the normal of the obstacle I touched to avoid the obstacle, using the reflection of the vector to avoid the obstacles. I still did this on the front raycasts since it allows some smooth transitions away from obstacles when running at them headlong. But on the side spherecasts, I took the straightforward route of using the normals. I did this because I didn't want to worry about glancing detections sending me off in an unintended direction. Now if the spaceship is running along a wall they will slightly steer away from them (nice!)
Other than these two slightly different parts it was business as usual for obstacle avoidance. The only real difference for the last part was combining the forces from the 5 spherecasts instead of 3+ raycasts to get the force needed to avoid obstacles.
Step 3 - Combining Flocking and Obstacle Avoidance
Finally! the last step.
The question we have to ask ourselves is "how should we combine these two different behaviors (flocking and obstacle avoidance)?". This is the step where you can either flex your powerful programmer brain (you can do it 👍) and craft a nifty solution for this problem or (hear me out) you can flex your powerful slacker brain and use a brilliantly simple (and equally valid) solution. I decided to go for the brilliantly simple solution since it works and its low cost (in terms of performance for both me and the computer). The simple solution to this problem is to just do one behavior or the other. flock when you have nothing in the way and avoid obstacles when you find them. depending on how I implemented obstacle avoidance this could have been a perfect solution, but alas this is just an almost perfect solution, the only problem with it is the fact that I don't have the spaceships avoiding each other in the obstacle avoidance behavior since the separation behavior keeps them apart. I could have done what I did for the flocking behavior and used weighted blending to integrate obstacle avoidance, but then you could run into issues where a poorly weighted value sends the spaceship right into an obstacle. I could have also integrated the separation behavior into my obstacle avoidance behavior, but what would happen if a spaceship was stuck between a flock and a hard place? same issue. In the end, doing one behavior or the other provided the cleanest/easiest result, and sometimes the simple solutions are the best ones.
THE END
I hope you found some of this information useful (if you made it this far). I find myself sort of ranting in these blog posts but I enjoy making them, and maybe one day someone will be helped by one of these posts. As per usual feel free to leave a comment below, I'll come back to either answer comments or tweak/update info if I feel like it's needed.
Until next time,
Written by Adam Currier
2/22/21

Comments
Post a Comment